| Temtem Radar | |
|---|---|
| |
| A radar specifically designed to find stronger and more unique specimens of the <Species> evolutionary line. | |
| Details | |
| Category | General |
| Subcategory | Encounter Rate Boost |
| Usage | Consumable |
| Availability | |
| Sell Price | 1250 |
| Tradeable | No |
Temtem Radar is a General Item.
Effect
General
Each Temtem Radar tracks a specific evolutionary line of Temtem, indicated on the item icon and in the description. Only one may be active at any point in time. Using the item will consume it and begin the radar.
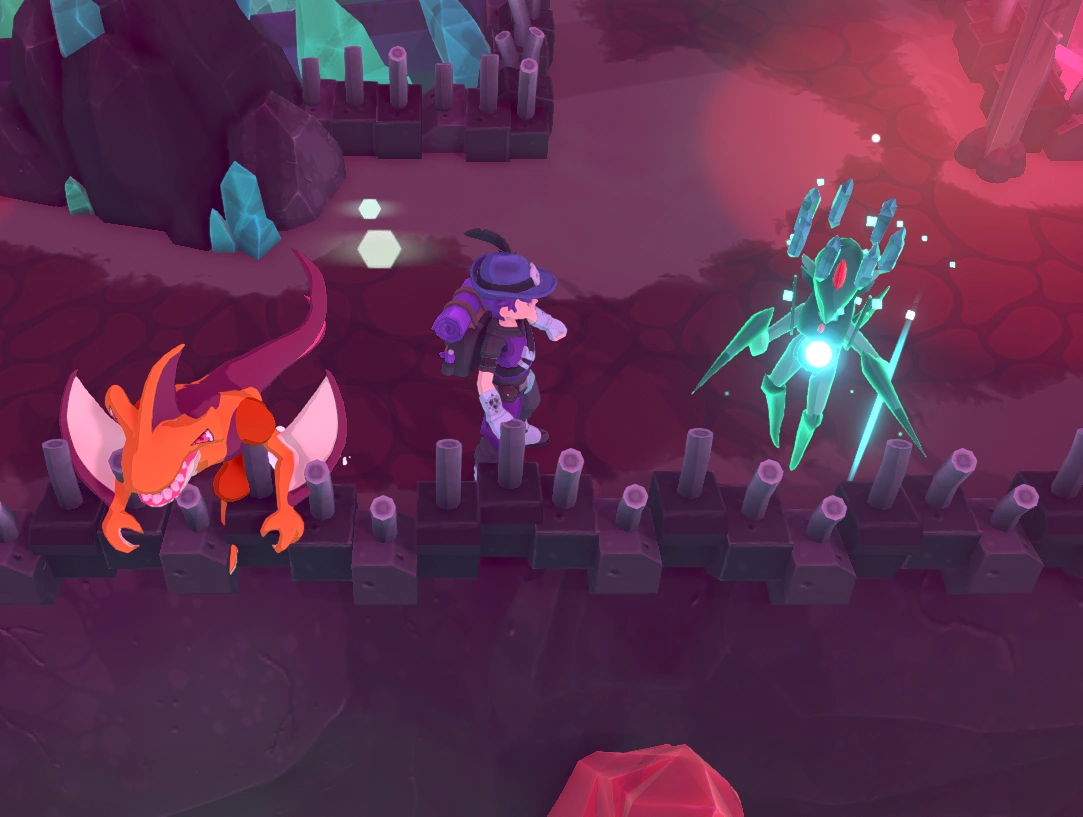
Starting a radar causes a meter to appear to the left of the minimap. This displays the current chain, an image of the current Temtem evolutionary line being hunted, and the current chain reward (increased SVs or Luma chance). The player being in or close to the grass patch where the radar Temtem naturally spawns activates a visual cue in the form of a blue hexagon blinking around the tracker image of the Temtem.
The radar does not activate for featured Temtem of the week at Saipark, but does for its native spawns. An active radar causes the target Temtem to spawn in the Overworld, the model of which can represent either a solo or double encounter. Running into an Overworld spawn engages in a Radar Encounter. Completing this encounter increases the radar counter by the number of Temtem in the encounter.
A radar deactivates in any area that does not naturally spawn Temtem being tracked, and will reactivate and resume chaining upon re-entering the natural habitat of the tracked Temtem.
Certain conditions may break the chain and will either break the radar, or reset the chain counter to 0 (see Breaking the Chain below).
Releasing a tamed, traded, or hatched Temtem while the radar is active does not affect the radar in chain. Encounters against NPCs, Dojo rematches, and any form of PVP also do not affect the radar. Items that affect appearances of wild encounters such as pheromones or scents also do not affect the radar.
Radars, whether in use or otherwise, expire at the weekly reset on Monday at 08:00 UTC (Coordinated Universal Time).
Radar Encounters
While a Temtem Radar is active, Temtem of the targeted evolutionary line will appear in the Overworld near their spawn zones and approaching them will trigger a special radar encounter. Certain Temtem that cannot appear in the Overworld in their spawn areas (such as Droply in water) will appear as clouds of dust.
The rate at which Radar tracked Temtem spawn in the Overworld depends on the natural wild encounter rate of the given area. A lower encounter rate area will generate radar encounters more slowly than a high encounter rate area.
Be aware that untamable Temtem such as third evolutions may appear as a radar encounter, if the player decides to do a radar at a shrine.
Radar encounter Temtem will initially appear at the levels and evolution found in that area and progressively increase as the radar chain increases. The levels of the Temtem will continue to increase to the player's "Tamer Level" minus 1 at the conclusion of the 300 radar encounters (e.g. if the highest level the Tamer has trained a Temtem to is 80, the radar tems will increase up to a cap of level 79). When the radar encounters have increased in level equivalent to the required levels to evolve the base level Temtem for the area, the evolved version of the Temtem will spawn.
For example, in an area where Paharo can be encountered at Level 6, Paharac will begin to appear when the radar encounter Temtem reach Level 13 (7 levels higher).
Radar encounter Temtem have their level, stats, and Luma status generated upon first appearance in the overworld and cannot be re-rolled. Should a player leave the spawn area or logoff, returning will respawn the same Temtem.
Note: If a Luma Temtem were to spawn as the first Temtem of a radar encounter, the Overworld Temtem would also appear as a Luma (or a distinctly glittering dust cloud, if on the water).
Chaining
Temtem Radars allow for the chaining of radar encounters. Current chain progress is displayed on the radar HUD next to the minimap. Defeating or capturing a Temtem in a radar encounter will continue and cumulatively increase the chain.
Chaining has the following benefits to radar encounter Temtem:
| Chain Length | Minimum SVs | |
|---|---|---|
| 0-99 | 50 | x1 |
| 100-199 | 20 | x5 |
| 200-299 | 20 | x10 |
The total chance of encountering at least one Luma over the course of the full 300 encounters is around 19.22%, compared to around 3.92% over the course of 300 regular encounters.
Breaking The Chain
A radar chain may break under certain conditions. Breaking the chain removes all overworld radar encounter spawns, and either breaks (no. of radar counter ≥ 50) or resets (no. of radar counter < 50) the radar. Breaking the radar causes it to disappear from the player's inventory, while resetting the radar restarts the chain, sets the radar counter to 0, and re-spawns the Overworld Temtem.
A Chain breaks if any of the following occur:
- Running from a radar encounter
- Capturing/defeating a Temtem of a different evolutionary line (which will only appear in non-radar encounters)
- The chain reaches 300 encounters
- Your last Temtem is knocked-out and you Blackout
Any competitive or NPC Tamer battle (including Lairs) will not break a radar.
Radar Co-ops
Players may co-op to share and complete the radar together at any point. Attempting to initiate a co-op session with a Luma Temtem in the Overworld will cause the game to ask the radar holder if they wish to reset all Overworld encounter spawns while keeping the current chain intact, or cancel the co-op session to maintain the current Overworld spawn of Luma Temtem.
Locations
Reward
Temtem Radars are only obtainable through Dojo Leader rematch victories. A player may obtain up to three Temtem Radars per week through rematches.
The species for each Temtem Radar is assigned randomly upon receiving it based on what Dojo Leader the player defeated. Rawiri and Murdag do not give a Radar upon victory. Depending on chance, a player may receive two or even three of the same species of radar in one week.
The chance of receiving a species reflects the rarity of the Temtem they spawn. Species that only spawn at a natural 5% rate are the rarest while species that have higher spawn rates are more common. Mythical Temtem are not available through Temtem Radars.
Note: As of Early Access 0.7.2 Radars of Temtem that only spawn with a 5% or 10% rate cannot be obtained through Dojo rematches.
| Image | Dojo Leader | Type 1 | Type 2 |
|---|---|---|---|
 |
Sophia | ||
 |
Rawiri | - | - |
 |
Tihani | ||
 |
Yareni | ||
 |
Musa | ||
 |
Dr. Sasaya | ||
 |
Murdag | - | - |
 |
Percival |
Radar Table
The following table shows what Temtem Radars are obtainable from which Dojo leader.
Gallery
-
 An untamed Luma Gyalis in the overworld.
 -
 Temtem radar encounters on water appear as dust clouds.
 -
 Luma encounters on water have a Rainbow around the clouds.
 -
 Nessla Radar HUD showing increased SVs.


Update History
- Early Access 0.7.2
- 5% and 10% Radars have been removed from the reward pools of Dojo Rematches until we find them a better home.
- Early Access 0.6.16
- Rare radar Temtem now spawn faster, but the rare Temtem Radars have a lower chance of dropping from Dojo rematches.
- Early Access 0.6.14
- Particles added to make Temtem in the overworld obvious in crowded areas.
- Radars can now be sold for 1250 each.
- Early Access 0.6.12
- Introduced.